3.实现modbusrtu采集
说明
举例现在有三个仪表需要采集,协议为modbusrtu协议,地址分别为1、2、3,功能码03,寄存器地址从0开始,数据类型为16位无符号;
接下来我们用python来实现数据的采集。
创建采集工程
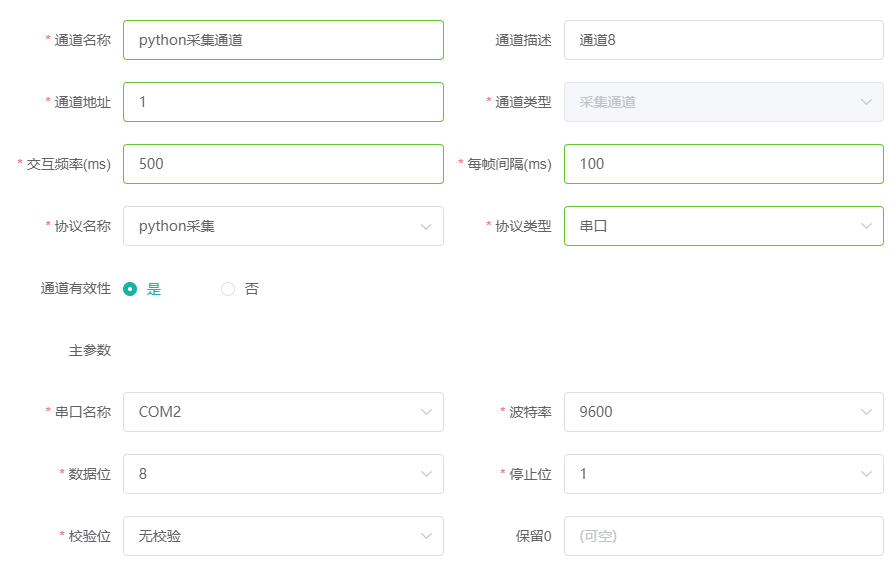
首先我们需要创建一个采集通道,驱动选择python采集,通道类型选择串口,并配置相应的串口参数。
在刚刚的采集通道下,新建一个设备,设备名称自定义,通讯地址填1(对应仪表的通讯地址)。

在刚刚的采集设备下,新建5个采集测点(按需配置测点数量),寄存器地址分别为3、5、7...,步长为2递增;
采集测点新建完后,我们将采集设备复制出来2份,通讯地址配置为2和3。

加载工程参数
取通道参数
使用get_chl_param函数,通过通道名称来获取通道的主参数,并使用serial库来设置串口参数,并打开目标串口,如下述片段所示:
提示
通过get_chl_param函数获取到的参数,需要经过转换,才可以被serial.Serial识别,建议根据实际情况在调用serial.Serial函数时直接将入参写死。
| Python |
|---|
| #==========================================================
#读取目标通道的主参数,并且根据参数打开串口
chl_name = "python采集通道"
uart_info = c4py.UartInfo()
c4py.get_chl_param(chl_name.encode(),1,ctypes.pointer(uart_info))
com_name = '/dev/tty'+uart_info.uart.decode()
parity = serial.PARITY_NONE
if uart_info.check == 0:
parity = serial.PARITY_NONE
elif uart_info.check == 1:
parity = serial.PARITY_ODD
elif uart_info.check == 2:
parity = serial.PARITY_EVEN
print("通道名称:" + chl_name + ";串口名称:" + com_name + ";波特率:" + str(uart_info.baud) +
";数据位:" + str(uart_info.data_bit) + ";停止位:" + str(uart_info.stop_bit) + ";校验位:" + str(uart_info.check) + ".")
ser = serial.Serial(
port=com_name, # 串口设备名称
baudrate=uart_info.baud, # 波特率
bytesize=uart_info.data_bit, # 数据位
stopbits=uart_info.stop_bit, # 停止位
parity=parity, # 校验
timeout=1
)
#将通道状态设置为正常
c4py.set_chl_status(chl_name.encode(),c4py.RUN_STAT_NORMAL)
|
取设备参数
首先使用get_dev_count函数得到通道下的设备数量,然后创建相应数量的设备数组,再使用get_dev_array函数取得设备参数。
| Python |
|---|
| #==========================================================
#根据通道取其下的设备信息
dev_count = c4py.get_dev_count(chl_name.encode())
print("dev count:" + str(dev_count))
#创建一个长度为 dev_count 的数组
device_info_array = (c4py.DeviceInfo * dev_count)()
c4py.get_dev_array(chl_name.encode(), device_info_array)
|
采集与解析
构造请求报文
通过设备的通讯地址、功能码、寄存器起始地址、测点个数,来构造请求报文,可以根据实际情况精简传入的参数;
然后通过ser.write函数写到目标串口去。
| Python |
|---|
| #构造请求buff
def build_send_buff(dev_comm_addr, func_code, reg_addr, reg_len):
send_buff = (ctypes.c_ubyte * 256)()
idx = 0
send_buff[idx] = ctypes.c_ubyte(int(dev_comm_addr))#从站地址
idx += 1
send_buff[idx] = func_code # 功能码
idx += 1
send_buff[idx] = reg_addr >> 8 # 寄存器地址高位
idx += 1
send_buff[idx] = reg_addr & 0xFF # 寄存器地址低位
idx += 1
send_buff[idx] = reg_len >> 8 # 要读取的长度高位
idx += 1
send_buff[idx] = reg_len & 0xFF # 要读取的长度低位
idx += 1
check_crc = crc16(send_buff, idx)
send_buff[idx] = check_crc & 0xFF # 存储低 8 位
idx += 1
send_buff[idx] = (check_crc >> 8) & 0xFF # 存储高 8 位
idx += 1
#print('发送>> ' + ' '.join(['%02X' % i for i in send_buff[:idx]])) #打印send_buff
return send_buff[:idx] # 返回有效长度为 8 的数组
|
读取报文并解析
使用ser.read函数读取仪表返回到串口上的报文,然后对报文的合法性进行校验,例如长度校验、从站地址校验、CRC校验等,按需精简或者加入更多校验;
报文合法性校验通过以后,即可对报文中的数据解析,并置入目标测点。
| Python |
|---|
| #解析读到的buff
def parse_read_buff(device_info,read_buff,need_len):
#打印recv_buff
#print('接收<< ' + ' '.join(['%02X' % i for i in recv_buff]))
#长度校验
if len(read_buff) != need_len:
print("读取的长度和预期的长度不相等")
return 0
#地址校验
if int(read_buff[0]) != int(device_info.dev_comm_addr):
print("从站地址错误")
return 0
#CRC校验
check_crc = crc16(read_buff, need_len - 2)
if check_crc != (read_buff[need_len - 2] + read_buff[need_len - 1] * 256):
print("CRC校验错误")
return 0
#可以再进行其它合法性校验,例如功能码是否匹配等
#首字节索引为0,从索引3字节开始解析,总长为need_len-3,步长step为2
step = 2
for i in range(3, need_len - 3, step):
byte_pair = read_buff[i:i+step]
#解析为大端,无符号,整型
int_value = int.from_bytes(byte_pair, byteorder='big', signed=False)
#解析为小端,无符号,整型
#int_value = int.from_bytes(byte_pair, byteorder='little', signed=False)
#强转为double
double_value = ctypes.c_double(int_value).value
#设置到对应的测点
c4py.dset_tag_value2(device_info.dev_name,str(i).encode(),double_value)
#print('解析:: ' + ' '.join(['%02X' % i for i in byte_pair])) #打印byte_pair
return 1
|
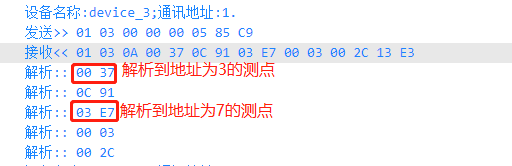
打印出来的报文如下图:
其它优化
1、可以根据parse_read_buff函数的返回值,来设置设备的通讯状态。
| Python |
|---|
| #解析数据
ret = parse_read_buff(device_info,recv_buff,need_len)
if (ret == 1):
c4py.set_dev_status(device_info.dev_name,c4py.RUN_STAT_NORMAL)#设备状态正常
else:
c4py.set_dev_status(device_info.dev_name,c4py.RUN_STAT_FAULT)#设备状态异常
|
2、出现异常时,可以设置测点的质量戳,也可以选择是否清零测点的实时值。
| Python |
|---|
| #解析数据
ret = parse_read_buff(device_info,recv_buff,need_len)
if (ret == 1):
c4py.set_dev_status(device_info.dev_name,c4py.RUN_STAT_NORMAL)#设备状态正常
else:
c4py.set_dev_status(device_info.dev_name,c4py.RUN_STAT_FAULT)#设备状态异常
c4py.dset_tag_qos2(device_info.dev_name,b"",c4py.TAG_QUALITY_BAD,1)#设置质量戳bad,且清零测点的值
|
3、注册系统信号处理函数,来接收程序退出消息,以释放资源。
| Python |
|---|
| #系统信号
app_exit_signal = 0
#系统信号处理函数
def handle_sigterm(signum, frame):
global app_exit_signal
app_exit_signal = signum
# 注册信号处理函数
signal.signal(signal.SIGTERM, handle_sigterm)
signal.signal(signal.SIGUSR1, handle_sigterm)
c4py.py_load_so()
c4py.global_init()
while True:
#do something
if app_exit_signal != 0:
print("app exit signal: [{}]".format(app_exit_signal))
break
#释放资源
c4py.global_release()
|
Serial参数说明
| Python |
|---|
| #校验位,例如 parity=serial.PARITY_NONE
PARITY_NONE, PARITY_EVEN, PARITY_ODD, PARITY_MARK, PARITY_SPACE = 'N', 'E', 'O', 'M', 'S'
#停止位,例如 stopbits=serial.STOPBITS_ONE
STOPBITS_ONE, STOPBITS_ONE_POINT_FIVE, STOPBITS_TWO = (1, 1.5, 2)
#数据位,例如 bytesize=serial.EIGHTBITS
FIVEBITS, SIXBITS, SEVENBITS, EIGHTBITS = (5, 6, 7, 8)
PARITY_NAMES = {
PARITY_NONE: 'None',
PARITY_EVEN: 'Even',
PARITY_ODD: 'Odd',
PARITY_MARK: 'Mark',
PARITY_SPACE: 'Space',
}
|
完整源码
| Python |
|---|
| import serial
import ptvsd
import signal
import c4py
import ctypes
#系统信号
app_exit_signal = 0
#系统信号处理函数
def handle_sigterm(signum, frame):
global app_exit_signal
app_exit_signal = signum
#CRC循环冗余校验
def crc16(data, length):
poly = 0xA001
crc = 0xFFFF
for i in range(length):
crc ^= data[i]
for j in range(8):
if crc & 0x0001:
crc >>= 1
crc ^= poly
else:
crc >>= 1
return crc
#构造请求buff
def build_send_buff(dev_comm_addr, func_code, reg_addr, reg_len):
send_buff = (ctypes.c_ubyte * 256)()
idx = 0
send_buff[idx] = ctypes.c_ubyte(int(dev_comm_addr))#从站地址
idx += 1
send_buff[idx] = func_code # 功能码
idx += 1
send_buff[idx] = reg_addr >> 8 # 寄存器地址高位
idx += 1
send_buff[idx] = reg_addr & 0xFF # 寄存器地址低位
idx += 1
send_buff[idx] = reg_len >> 8 # 要读取的长度高位
idx += 1
send_buff[idx] = reg_len & 0xFF # 要读取的长度低位
idx += 1
check_crc = crc16(send_buff, idx)
send_buff[idx] = check_crc & 0xFF # 存储低 8 位
idx += 1
send_buff[idx] = (check_crc >> 8) & 0xFF # 存储高 8 位
idx += 1
#print('发送>> ' + ' '.join(['%02X' % i for i in send_buff[:idx]])) #打印send_buff
return send_buff[:idx] # 返回有效长度为 8 的数组
#解析读到的buff
def parse_read_buff(device_info,read_buff,need_len):
#打印recv_buff
#print('接收<< ' + ' '.join(['%02X' % i for i in recv_buff]))
#长度校验
if len(read_buff) != need_len:
print("读取的长度和预期的长度不相等")
return 0
#地址校验
if int(read_buff[0]) != int(device_info.dev_comm_addr):
print("从站地址错误")
return 0
#CRC校验
check_crc = crc16(read_buff, need_len - 2)
if check_crc != (read_buff[need_len - 2] + read_buff[need_len - 1] * 256):
print("CRC校验错误")
return 0
#可以再进行其它合法性校验,例如功能码是否匹配等
#首字节索引为0,从索引3字节开始解析,总长为need_len-3,步长step为2
step = 2
for i in range(3, need_len - 3, step):
byte_pair = read_buff[i:i+step]
#解析为大端,无符号,整型
int_value = int.from_bytes(byte_pair, byteorder='big', signed=False)
#解析为小端,无符号,整型
#int_value = int.from_bytes(byte_pair, byteorder='little', signed=False)
#强转为double
double_value = ctypes.c_double(int_value).value
#设置到对应的测点
c4py.dset_tag_value2(device_info.dev_name,str(i).encode(),double_value)
#print('解析:: ' + ' '.join(['%02X' % i for i in byte_pair])) #打印byte_pair
return 1
if __name__ == '__main__':
# 注册信号处理函数
signal.signal(signal.SIGTERM, handle_sigterm)
signal.signal(signal.SIGUSR1, handle_sigterm)
#==========================================================
#启动调试,等待调试器附加,正式运行时注释下述两行
#ptvsd.enable_attach(address=('0.0.0.0', 5678))
#ptvsd.wait_for_attach()
#==========================================================
#库初始化
c4py.py_load_so()
print("c4py version:" + c4py.C4PY_VERSION)
c4py.global_init()
    #==========================================================
    #读取目标通道的主参数,并且根据参数打开串口
    chl_name = "python采集通道"
    uart_info = c4py.UartInfo()
    c4py.get_chl_param(chl_name.encode(),1,ctypes.pointer(uart_info))

    com_name = '/dev/tty'+uart_info.uart.decode()
    parity = serial.PARITY_NONE
    if uart_info.check == 0:
        parity = serial.PARITY_NONE
    elif uart_info.check == 1:
        parity = serial.PARITY_ODD
    elif uart_info.check == 2:
        parity = serial.PARITY_EVEN

    print("通道名称:" + chl_name + ";串口名称:" + com_name + ";波特率:" + str(uart_info.baud) +
    ";数据位:" + str(uart_info.data_bit) + ";停止位:" + str(uart_info.stop_bit) + ";校验位:" + str(uart_info.check) + ".")

    ser = serial.Serial(
            port=com_name,  # 串口设备名称
            baudrate=uart_info.baud,  # 波特率
            bytesize=uart_info.data_bit, # 数据位
            stopbits=uart_info.stop_bit,  # 停止位
            parity=parity,  # 校验
            timeout=1
    )
    #将通道状态设置为正常
    c4py.set_chl_status(chl_name.encode(),c4py.RUN_STAT_NORMAL)
    #==========================================================
    #根据通道取其下的设备信息
    dev_count = c4py.get_dev_count(chl_name.encode())
    print("dev count:" + str(dev_count))
    #创建一个长度为 dev_count 的数组
    device_info_array = (c4py.DeviceInfo * dev_count)()
    c4py.get_dev_array(chl_name.encode(), device_info_array)
#==========================================================
#遍历设备,开始通信
while True:
for device_info in device_info_array:
#print("设备名称:" + device_info.dev_name.decode() + ";通讯地址:" + device_info.dev_comm_addr.decode() + ".")
reg_addr = 0 #起始寄存器地址
reg_len = 5 #要读取的寄存器个数
need_len = reg_len * 2 + 5 #期望返回的长度
ser.flushInput() # 清空输入缓存
#构造请求报文
send_buff = build_send_buff(device_info.dev_comm_addr, 0x03, reg_addr, reg_len)
#发送数据
ser.write(send_buff)
#读取数据
recv_buff = ser.read(need_len)
    #解析数据
    ret = parse_read_buff(device_info,recv_buff,need_len)
    if (ret == 1):
        c4py.set_dev_status(device_info.dev_name,c4py.RUN_STAT_NORMAL)#设备状态正常
    else:
        c4py.set_dev_status(device_info.dev_name,c4py.RUN_STAT_FAULT)#设备状态异常
c4py.dset_tag_qos2(device_info.dev_name,b"",c4py.TAG_QUALITY_BAD,1)#设置质量戳bad,且清零测点的值
#休息一个帧间隔
c4py.msleep(50)
#休息一个交互频率
c4py.msleep(300)
if app_exit_signal != 0:
print("app exit signal: [{}]".format(app_exit_signal))
break
#释放资源
ser.close()
c4py.global_release()
|